Before we get started I am going to run down the list of items I will be using to create these ruins. Being hobbyists, many of the items I am going to list you probably already have laying about from past projects. The few items you may need to purchase are relatively common and can be picked up at your local DIY store like Home Depot or Lowes.
Main Items
- Particle board
- 1 sheet of pink foam. 1 sheet generally is more than enough for many terrain projects. If you don't need that much or have a small car you can ask the store manager if they have any broken or damaged sheets that they can sell at a discount.
- White foam - I usually save some packing foam from appliances or electronic devices. The one used in this project came from a deep fryer I received for christmas.
- Wood Glue
- Sand Paper (fine)
Add ons
- Sprues from your models
- Bamboo sticks, tooth picks, nails
- Pen tube
- Plastic tube
- Exacto knife
- Cutter
- Pruning snips
- Sand
- Shale
Gather the items needed to get started. Make sure you have ample work space as this can get messy real quick.

Step 2:
Cut the base for your ruins. The ones here are 10 x 10 inches but you can cut them to any size. I lightly sand down the edges and surface area and then quickly sketch out a perimeter of the ruins.

Step 3:
In this step I take the white foam and give it a look over. Look to see if there are any surface areas that may look like a wall or similar feature. I know its hard to visualize a wall or a structure initially but just look for basic shapes to get started.
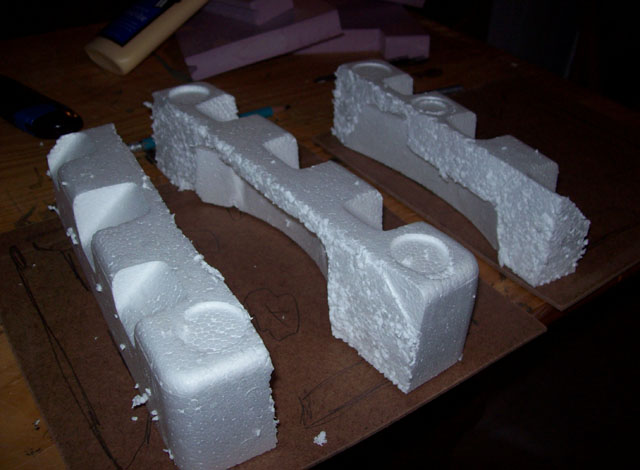
Here I broke apart some areas that kind of looked like it would make a thick wall with some crenellations. Again, don't look for exact sizes or shapes, just look for rough shapes. You can use the sketches on the board as a visual aid in case you need a size reference or how a corner should look.
Here I have a small section of a wall.

With my razor blade I cut off the top rounded areas to start giving it a more man-made look. You can also cut away rounded corners or other sections that don't look right.
 |
| Start cutting away rounded corners or sections that don't look right. |

Next I'll sketch out an area where I want the wall to looked like it collapsed. Then I start plucking sections out with my fingers. There is no right or wrong way to do this, just turn it about in your hand as you pull the foam until you get a feel for it. Again, don't expect it to look exactly right at this stage.
 |
| Sketching in guide lines helps keep your wall's shape. |

Note in this picture I cut away the rounded corners to give the foam a smooth, sharp look.

At this point I lightly sanded the foam with fine sandpaper. Please wear something like a surgical mask during this step. Believe me, its not fun breathing this stuff in.
Step 4:
Now that you have the basic shapes made. Place them on the boards in the areas you sketched out.


Don't glue them down just yet.
Step 5:
This is where you start adding in details to make the ruins more realistic. Cut a section of pink foam. This one is about 8x8 inches. The foam should be 1 inch thick so take a ruler and make a series of 1/2 inchmarks along each side. Then ever so carefully slice the foam in half so that you have two, 8x8 pieces of foamthat are a 1/2 inch thick. I like to make them 1/2 inch think so that they look more realistic rather than alarge piece of foam but feel free to leave it at 1 inch think if you want.

Now, when you slice it in half, there will be one surface area on each section that is all gouged up and crappy looking. That is alright sinceit is a ruined building. Simple take your sandpaper (and mask) and sand the rough section down until it looks something like this.

Then I sketch out the outline of the blasted upper walls. You can hold it up to the area of the white foam that it will sit upon to get an idea of size reference. Cut the shape out carefully with your blade. (I've shed enough blood on my terrain projects to make Khorne weep with joy).


Step 6:
Now we are ready to add this wall to the white base wall. Place it on the white foam to get an idea of how it will look. Then, with a ruler, draw a line down where you will be cutting the wall to make the "L" shaped corner.


Cut the wall section then place it on the wall again to see how it will look. Again, don't worry about gaps or overhanging areas, we will deal with those at a later stage. We just are looking at general placement.


Now take your bamboo skewers. Note, you can use any item you want for pinning. I've used nails and toothpicks in the past but you will definitely want to use something to pin the sections together to make your ruins last longer.


When I am ready to push in the pins I usually grab a drill bit and by hand, slowly twist it into the foam. This way you create a hole for the pins. Insert the pins into one section of wall. Line up the two wall areas together and let the pins indent the area of the other wall. Then carefully make the holes in the second piece but be careful not to go through the wall entirely. If you happed to go through it’s ok as the pin sticking out may look like a steel beam. Then glue the pins in place and then glue the walls together.


Again, don't worry about gaps yet. Then repeating the above process, glue the pink foam walls to the white foam.

 | |
| Keep a model nearby and test for size and scale every now and then. |

Now glue the walls down to the board.
Stage 7:
Here is where your ruins start coming to life. Gather your excess pink foam, model sprues, sand, shale, tubing, bits and what ever you have laying around. Common items such as pen tubes and kid toys work great for this stage.

Let's make our steel beams that will be sticking out of the walls. Cut some sections of old modeling spruces. I tend to cut them in various sizes from 1-3 inches.

Then carefully cut away the protruding section with your blade until they look like this.

Then with your fingers or a pair of pliers, gently twist them so they look contorted.

Next, take the drill bit again and by hand, gently drill in a hole for the sprue. Glue them in place.


Next, take some of your small, left over chunks of pink foam and cut out various shapes that will become the base for the rubble. Feel free to get creative by cutting chunks, plucking pieces out, etcs... to give the rubble a battle damaged look. I like to create different sizes and shapes but keep a model handy and make sure you leave sections wide enough for them to stand on. Nobody likes "woobly model syndrome".


Before you glue down the foam give it a quick sanding to smooth out rough edges and add battle damage. Then test fir the pieces on your board for placement before you start gluing the foam to the board. Feel free to glue on some pieces of shale, tubing, models bits, weapons, or pieces of vehicles to add realism to the ruins.
At this point I leave the glue to set for overnight. So far the above stages took me about 5 hours from stage 1 to stage 7. Depending on how comfortable you are with cutting foam and adding "damage" it may take you a little less or longer.
In the next article we'll be adding the sand and other debris to the ruins, filling in gaps and then painting the ruins. Feel free to ask any questions or point out other ideas that you've found successful in the past and share with our readers.
Wow! Great tutorial man, i was enjoying this as my first read of the day:)
ReplyDeleteThis is incredibly thorough and well done. Thanks for sharing and for making me feel bad about my half done table.
ReplyDeleteAgreed.
ReplyDeleteVery affordable and probably doable in the time that we spend painting a single marine these days.
I was originally skeptical of the foam width, but seeing this come together and having played on your other ruins, I'm a big fan now. It helps sell the epic scale of construction 40,000 years from now. The fluff is full of "5 feel of rockcrete here" and "3 feet of plasteel there" stuff anyways.
I haven't been happy with my attempt at ruins with my foam cutter. The cuts are too clean and smooth to sell the battle damage look. Maybe we could trade. You make me some epic ruins and I'll make you some jungle patches or crystals or whatever.
Can't wait for part 2!
Most of this has been trial and error over the past few years. I learned a lot when I was building the mayan ruins terrain in order to create a weathered and worn down look. Simple things like sanding a corner or "kneading" the foam with a large rock can really add more realism to the piece.
DeleteGreat article. Definitely looking forward to the next installment as the painting of foam is typically one of my bigger challenges. Definitely a great change of pace in the blogosphere. We'll spend $$$$$ and lots of time on painting minis, but I often see the tables neglected.
ReplyDeleteAgreed, too many terrain pieces are comprised of a couple of walls, or a hill glued to a board. While this may be fine for some people who just want to have something to play on, I prefer to take the extra couple of hours and add realism to my pieces by incorporating layers and details to the board. The first installment I added the layers (rubble) and in the next installment I'll be adding bits of shale,sand, and bits to the board before I seal it and start painting. Glad you like what I've done so far.
DeleteI like it! Makes me sad that I recently threw out some foam that would have been perfect for this.
ReplyDeleteHa, guilty of that. Now during Christmas time or birthdays I always gather up and save some of the packing foam that comes in the boxes. I am also prone to poking around craft stores and flea markets looking for cheap items I can add to my terrain. For example, the large skull I have pictured on last weeks post came from a Michaels Craft store. They always have tons of cool skull/creppy stuff out prior to halloween and afterwards the drop the prices pretty cheap. The wedding section also has cake pillars, which are the perfect size for using in terrain.
DeleteGreat tutorial, man. Some very nice terrain from very simple materials.
ReplyDelete