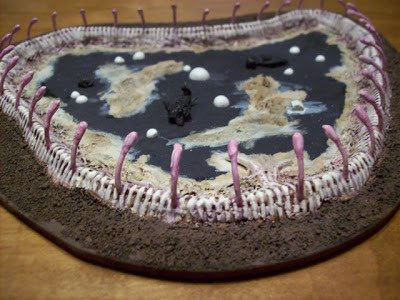
Last week I left of with the glue drying along the interior walls of the digestion pool. To create an organic and creepy look I used the white glue/super glue method that Hyv3 Mynd posted in a previous article. Basically you apply your white glue along the surface and then squeeze some drops of super glue onto the white glue. Then take a toothpick and swirl it around to mix the two glues. As you do this you will notice that it starts to get stringy pretty quick. On a side note, its best if you do this in a well ventilated area as the fumes were pretty strong while I was mixing the glues together.
 |
| This how it looks wet |
 |
| Once it dries it looks like this. |
 |
| Close up of the glue effect |
Step 1: Poison fronds
When I was sketching out my ideas in a note pad, one of the main themes that I wanted to carry on through all of these pieces is that everything the tyranids make has the ultimate goal to kill and consume. So it would make sense that the digestion pools would have sticky, poisonous fronds ringing the rim of the pools to immobilize and prevent any potential prey from escaping the pool. This is similar to what some plants like the venus fly trap or pitcher pod plants do to their prey.
So for starters I picked up this tropical looking plant from a local craft store.
I clipped off the red and green fronds and then I further cut the longer, slender red fronds from the thicker green ones. The green ones will be used in a further project.
Then, with my pin vice I drilled a hole into the clay wall.
Then I tested out to see how the frond would look before I went any further.
Once I felt good about the look and feel I repeated this step around the entire border, keeping each hole about 1/2" apart.
Once I made sure each piece fit right and looked even, I glued them into place.
 |
| This pool is kitty approved |
I primed both pools black and then I painted the initial base coat in a terra cotta color (thanks Icereaver)
Next I mixed up a cream color mixture using some folk art paints. I applied it using a dry brush method so that some of the terra cotta color showed in the deep areas. Once that dried I applied a couple coats of Devlan mud (or whatever they are calling it now)
Once that dried I added more white to the cream mixture and dry brushed the surface areas lightly. Then I took some liche purple and watered it down into a wash and gave the entire clay base a wash. Then I painted just the fronds with this wash 4-5 times, allowing it to try between applications. Just before the final application I added a little scab (khorne) red to the wash. This would make the fronds stand out from the base and give them an ominous look (Thanks to Chaoscraig for suggesting the red fronds) Then I added more white to my mixture and lightly dusted the clay walls one last time.
 |
| Terra cotta base coat |
 |
| Many layers of purple washes on the fronds |
 |
| Inside view of the pool |
 |
| Overview of the pool |
In next weeks wrap up I will have the inside of the digestion pool completed and I will have some plants and rocks added to the outside of the pool to complete the look.
Thanks to everyone for their input into the project so far and keep those ideas coming.


Wow, this is looking brilliant, can't wait to see it completed, Nick
ReplyDeletelooking awesome kev. cant wait to see it finished!
ReplyDeleteFunny I just saw this cause I was doing something along the same lines at STC.
ReplyDeletehttp://www.standardtemplateconstruct.net/2013/05/more-realistic-terrain-toxic-slime-pits.html
Looking good, I like the 'feeders"
Looks great so far. You'll have to build a 'Nid army after the project to match your terrain. I've heard of people building terrain to match their army, but doing the reverse would be really interesting also.
ReplyDeleteCan't wait to see the icky gooey final pieces. You can get some cool effects by coloring water effects and resins, or pouring clear over a painted base.
This looks pretty darn good :) thanks for the mention by the way :)
ReplyDelete