
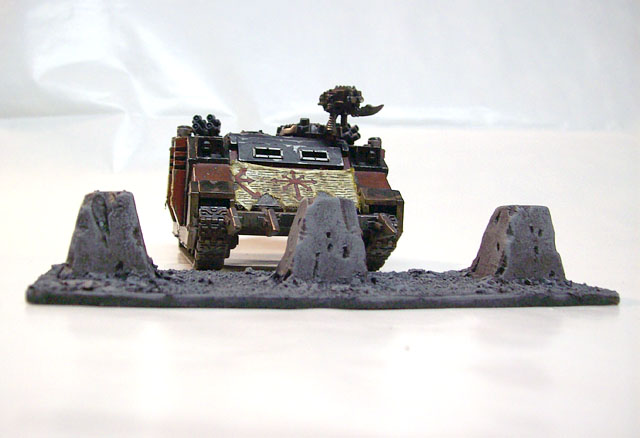
During the 41st millennium countless wars rage across the galaxy and imperial cities often bear the brunt of the invasions. Plascrete tank traps and barricades are often deployed along choke points to prevent armored tanks and mechanized infantry from breaching the defenders lines and to create kill zones. The rules for tank traps can be found in the battlefield debris section of the rulebook on page 105.
To get started you will need the following materials:
Particle board
1 inch thick Pink foam
Glue
Shale or woodchips
Sand
Equipment Needed:
Razor blade
Ruler
Paints and brushes
Step 1:
Cut your base out of particle board. As I did with the tangle wire, I marked off 4 sections that are 6 inches by 2 inches and then lightly sand down the edges to remove any rough areas.

Step 2:
Take a section of 1 inch pink foam and measure off an area that is 1 inch across and then cut it so that you have a piece of foam that is 6" x 1" x 1".


Step 3:
Next, mark off 1 inch sections on the strip. In my picture here you will see that I have marked off 6, 1 inch sections.

With your razor blade, carefully cut along the line until you have 6 1" x 1" x 1" cubes. Here is what mine looked like after I cut two sections of foam. You will see that you can fit 3 cubes onto the 6" x 2" base that we created. You can add another if you like but I wanted to leave enough room for an infantry sized model to fit within the gaps.

Step 4:
Take the 1" cube and a ruler and mark off the 1/4" and 3/4" inch line on one side of the cube.

Repeat this for each side on the one facing.

Then connect the lines with a ruler so that it looks like this.

Now flip the cube onto the side and place the top of the razor blade up at the 1/4" inch line and carefully slice down to the bottom in a diagonal cut.

Repeat cutting on the remaining three sides until you cube looks like this.

Don't worry if you don't cut the angles precisely, as we will be fixing that shortly.
Step 5:
Lightly sand the pyramid shaped cubes to remove any rough edges and nicks that your blade may have caused.

Then, with your exacto knife, carve out small sections of foam along the diagonal edges and at the top to represent battle damage. You can also chip away small holes on the mid-sections to represent bullet impacts.


Now glue the shapes to the board and be sure to leave enough space between the blocks for an infantry sized base to fit in between each section.
Step 6:
Next, add the shale and sand to the bases. To see how I applied the shale and sand please review my earlier articles in the Creating City Terrain series.


Step 7:
Next, paint up the tank traps using the same method as outlined in the previous articles.


This project took a total of about 3 hours. I was able to do Steps 1-6 in under 2 hours and the painting I did the next day after the glue had properly dried. Painting all four sections took just about an hour as I had to let each coat dry before adding the highlights.
I hope you enjoyed this article on tank traps and that you take the time to create them and use them in your games. Next week I'll be rounding out the Creating City Terrain series by showing you how to take common, inexpensive items and making unique and cool looking terrain pieces to add to your city terrain boards. Until then, have fun gaming.
Yet another great and inspiring terrain article!
ReplyDeleteKeep up the good work!
I concur, these are amazing - each one also makes me look at the sorry excuse I call a gaming table and cringe.
ReplyDelete