
The first step was to create the "blocks" that will eventually become the ruined walls. I cut some layers of air-hardening clay into sheets about a 1/2 inch thick and then rolled them out with a rolling pin so that each layer was smooth and uniform. Then I took a strip of cardboard about 1/4 inch wide by 8 inches and marked off lines every 1/2 inch on the strip. While the clay was still wet, I cut the clay into 1/4 inch strips.

Once the clay hardened, I marked off the 1/2 inch increments and then cut the pieces with a utility knife (razor blade). It didn't matter if some of the pieces broke off or were a little uneven since these are supposed to look like aged and broken stones.

Once a had a couple of hundred pieces, I sanded down each block so that they were somewhat of uniform shape and size. Any that were defective I simple broke in half and/or whittled down sections to look like the block had broken apart over time.
Once the blocks were ready I took some left over pieces of hard board that I had from previous projects and I cut out various shapes and sizes and then sanded down the edges so that there were beveled to prevent "wobbly" model syndrome. Then I started to arrange the blocks on the board until the shapes of the walls started to appear. Then I glued them in place with a mixture of wood glue and black acrylic paint.

The reason I mixed in the black paint was so that it basically primed all of the tiny, hard to reach nook and niches that would be hard to reach once the walls were fully built. Another thing you will see is that I purposely staggered some of the blocks so that they looked like they are over hanging other bricks due to shifting land, flooding, war, etc...
 |
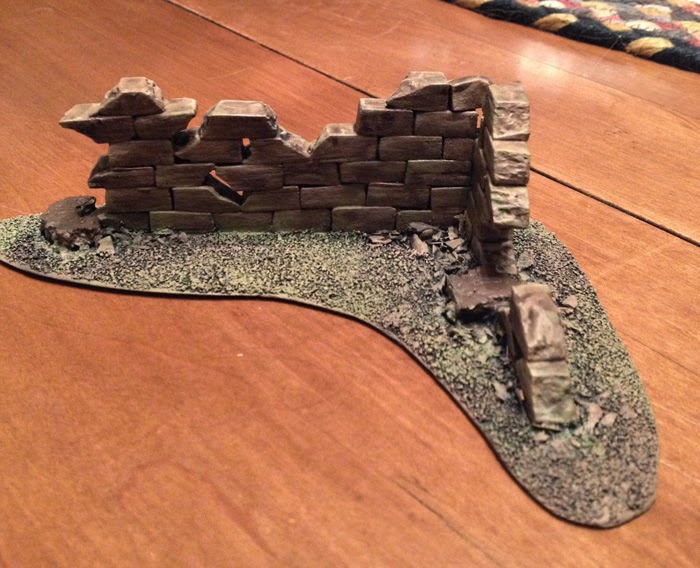
| Evil Commissar Hank is overseeing the construction of the walls. |

In the above image I added in a piece of dead wood that was modeled with the wall to give the effect that at some time in the past a section of a nearby tree broke off and crashed down on the wall, causing a section of it to crumble away.

Next I glued on bits of shale to resemble pieces of the walls that have fallen off. I also added sections of cork board that will eventually be the base for foliage growing around the walls.


Next up I painted all of the blocks in a terra-cotta color like I originally did for the tiles on the base of the board and then I added sand over the wooden base.


Next I painted the sand black before I started painting the walls. For the walls, I basically used the same color palette that I used for the tiles on the base board so that they all look like they belong together on the board. The only difference is that I painted raised high-lights to give the walls a more marbled look and feel.


Once the walls were done I gave them a couple of coats of Earthshade Agrax to sink into all of the cracks and joints between the blocks. Then I painted to sand surface to resemble the base of my board.

Next I started to work foliage into the cork board pieces. Also note that I dry brushed certain parts of the wall with a green paint to represent moss growing up the side of the walls.


In the above pic you can see that I started to work static grass to help give the illusion that vegetation is slowly growing over the walls. (plus it helps to hide any sections that did not fully mesh between the sand and the blocks.)


Finally, I glued on some of the small green flock to the sides of the walls to give the illusion of moss growing. Then I took the finished pieces down to the table so that you can see how it all looks.


Here are some shots of all the pieces arranged together to form a basic ruined structure.


Well, how do they look with models for size comparison? Glad you asked...

A rhino can easily claim a 25% obstruction on most of the pieces. While for troops...

This corrupted follower of Logar can easily claim a nice 4+ cover save from the walls.


Well, this project took a couple of weeks but I think the efforts were well worth it. In the next week or so I should have images of a larger temple structure well under way to start showing you the pictures. I hope you all enjoyed this post on building simple ruins.
Nice post.
ReplyDeleteFlush Door Manufacturer in India, Block Board Manufacturer in India
Looking great, very sharp set of terrain you've got there. Hope the resin pouring is going well!
ReplyDeleteKonrad, In some of the above pics you can see that I indeed started pouring the resin. The first layer pretty much got sucked into the base so only a few shallow pools formed. Over the course of this month I'll slowly be adding more layers along with coloring and as soon as its done I'll post pictures.
DeleteAh, now I see it. Doesn't look like there's any clouding or eating away of the foam, so good start!
Delete