Items you will need:
Particle board
Left over sprues
Baling wire
Glue
Sand
Shale/woodchips
Ruler
Exatco knife
Razor blades
Dremel Tool
Modeling glue
Step 1:
Cut out the base for your tanglewire. Since Games Workshop does not provide dimensions for such pieces I make mine 6" in length by 2" wide. This provides a nice surface are to block pathways without taking up too much real estate on your board. Here I cut 4 pieces at 6"x2"
Step 2:
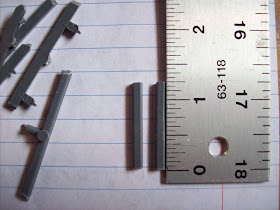
Take your left over sections of model sprue and with your pliers or razor blade, cut out straight sections that are roughly 2 inches long.
 |
| Never throw away your left over sprues! |
With a razor blade, carefully cut off the tags and vents so that you are left with a smooth, straight section of sprue. Also be sure to scrape away any mold lines, numbers or the GW stamp. Then cut the smooth pieces at 1 1/4 inches.
For my projects I generally put in 5 posts for each 6 inch length of board. So for each section I would need 40 pieces of 1 1/4" sprue sections cut and cleaned.
Step 4:
Take two sections of the sprue and put a dab of glue in the center of one of the sections.
Then take the other section and lay it over the piece with the glue and then twist until you form an "x"
When done you should have 5 "x" for every 6" piece of board.
Let the glue set overnight.
Step 5:
Now take the 6" piece of board and 5 of the x shapes.
Starting from about an inch in from the side, place an "x" beam in the center and mark the edges with a marker.
Then every inch after the first continue to mark off where the "x" will be. Now they do not need to be perfectly centered and I prefer a jagged or disjointed look so that it looks like it was deployed in haste or has suffered from some artillery barrages.
Step 6:
Take a dremel tool with a grinding edge and gently grind into the board where you marked the placement of the "x" beams. I usually do it a little wider than the mark to give it some room.
It helps to test fit the "x" as you are grinding so that you know they fit properly.
 |
| Periodically test to make sure that the "x" beams fit nicely into the hole. |
Once all the marked areas have a hole created, glue the "x" beams in place and let sit overnight.
Here is a scale shot during assembly
Step 7:
Now we are ready to add the tanglewire and basing material to the bases. Here is a picture of the items I'll be using in this step.
 |
| "x" beams set in the dried glue. |
Take the baling wire and wrap it around a magic marker of some other cylindrical shape. Here I am using a black tube that is roughly the same size as a black marker. This will give the wire its shape.
Also, GW sells section of tanglewire for $10. I've always been interested in trying this out but I have not seen it in my local store. If some one has used it, let us know how well it holds it shape.
Next, take a pin drill and gently drill in two small holes on each end of the board.
 |
| Gently drill in a small hole on each end of the terrain piece. |
 |
| This will help anchor the wire to the board. |
This will help hold and anchor the wire as you place it over the "x" beams.
Step 8:
Once the wire is in place and anchored on each end, glue on some pieces of shale or woodchips to represent rubble. This will not only help it make your terrain piece look good, but it will also serve to hold the wire in permanently and protect it from getting pulled out. Let the glue dry for a few hours.
Step 9:
Now add sand to the board to complete the look.
Step 10:
Paint the pieces up in the same fashion I showed you in the city ruins and city rubble articles.
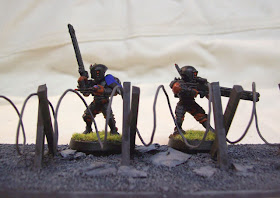
Here is how the pieces look with some models around it.
Here are some shots of the tanglewire setup with the city ruins and rubble I created earlier in the series.
For next week I am going to highlight a side project I have been working on for my Word Bearers. I am making two models that are currently not even in the codex, nor probably ever will be but its a project that has been bouncing around in my head for several years. Here is a sneak peek of the model under construction.
 |
| At-43 meets 40k?!?! What is grubnards thinking??? |


Great terrain as usual! As far as the gw razorwire i think its awesome and a decent amount for $10
ReplyDeleteim gonna guess some crazy ethereal?
ReplyDelete